Load Your Gunny Sack: The Bare Necessities of
Low-Budget Gunfight Creation
by
Jeremy Hanke
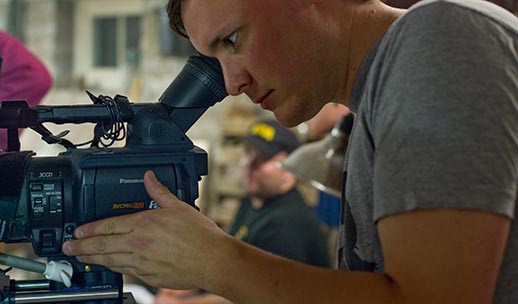
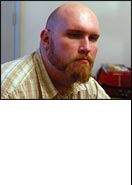
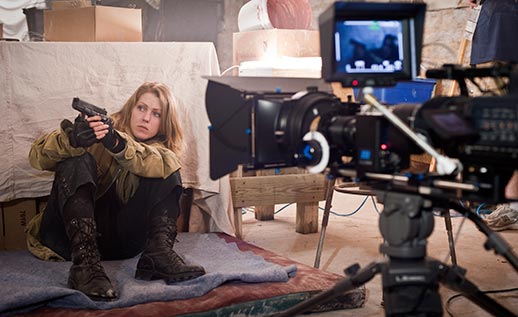
Behind the scenes photo from Depleted: Day 419. (Kat Carney featured.)
Everyone wants to know what the bare minimum is to get started with creating gunfights. Unarguably, you're going to have some people say that there are less expensive options than a few of the things we mention, most notably software. However, each of these elements that we mention are designed to make sure your abilities are extremely scalable, so that, as you get more confident with your skills, you can grow without having to switch out all your skills. By using the basic necessities we describe here, you'll easily be able to upgrade as time goes by!
Disclaimer: Some of these are specific products and others of these are just descriptions of types of products. We haven't received any compensation for listing specific products in this list. The named products are mentioned here specifically because we've found them personally useful and would be remiss in not mentioning them to you.All links to specific products are actually to their reviews, so you can see how they were originally reviewed by our team, long before this article was ever conceived.
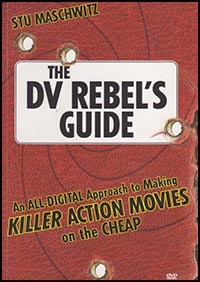
Stu Maschwitz' DV Rebel's Guide The DV Rebel's Guide is arguably the best $50 you can spend if you want to make a low-budget action film. Stu Maschiwitz is the co-founder of the visual FX house, The Orphanage, the creator of the amazing Magic Bullet software (distributed through Red Giant Software), and a former FX artist for Industrial Light & Magic. Despite all of his credentials and connections, he loves making low-budget FX films to prove that it can be done. He's packed this book full of information about making low-budget action films and even includes basic gunfight assets and algorithms for After Effects to get you up and running very quickly.
Additionally, he includes home-brewed plugins for After Effects, explosive assets, and even a project to allow you to create muzzle flashes and ejected brass. Now, with that said, the assets are nowhere near as robust as you get with Video Copilot's Action Essentials 2 or FXHome's Video FX collections, but they're still impressive for being included on a DVD with all the other stuff that comes with this book!
My one encouragement would be that you read the entire book before you run off and start shooting action sequences. As that's a vain request (since it's impossible to read this book and not get too excited to contain yourself at multiple locations), I'd at least encourage you to do very basic projects until you finish the complete book. Some of the later stuff will really help you with more complex projects and you'll know how to prep for them in production if you've finished the book ahead of time! (As a personal acknowledgment, I learned this the hard way, so I would recommend others learn from my mistakes!)
Adobe After Effects
I know, I know. The second thing you see on the list could be the most expensive thing on the list (depending on what camera your using). However, there really is a reason that After Effects is the premiere FX program, with every eschelon of filmmaker! The reality is that you need a program that has more control over images, speed, and plugins than a traditional video editor. While you can certainly edit a gunfight with a traditional editor, your ability to make combined effects that are truly believable is far lower than it will be with After Effects. People like Andrew Kramer and Stu Maschwitz are living proof that some good training, this is a program that will allow you to do things you've only seen in Hollywood films.
Fortunately, for you, if you don't already have access to it, there are lots of ways to get a legal copy of After Effects that will do what you need for less than the $995 purchase price. The most common way that most low-budget filmmakers get it is through the Adobe Production Premium set. Priced just a few hundred dollars more than Final Cut Suite, Production Premium is packed to the gills with almost every software package a filmmaker could want, including After Effects. For students, Adobe offers an extremely reduced priced student version of After Effects or Production Premium. However, if neither of those are options for you, you can also think outside the box and buy a legal copy of an older edition of the software on Ebay. Most of the best training out there will will work with anything from AE 6.5 on (although, if you can at least get AE 7, you'll be glad you did as it is much more streamlined and AE 7 introduced PixelMotion, a very powerful slow motion option)! And, depending on how old the software is that you buy, it may still be eligible for the upgrade to the newest version of After Effects. (The Award Winning director of Livelihood, Ryan Graham, did this for some of his software when it came time to create his film!)
Try to find the most light senstive camera you can. This could be a designated video camera like the DVX100 or the HVX200 featured here, or it could be one of the new video DSLR cameras. (DP Nathan Eckelbarger featured from his work on Depleted: Day 419)
The Most Light Sensitive Digital Video Camera (You Can Get Ahold Of) Which Has Manual Control of Shutter Speed
You'll notice there are no brand names that go with this. That's because almost any video camera or video capable DSLR could be utilized, from a Panasonic DVX100, Sony HVR Z7U, or Canon 7D. (Notice we didn't mention a RedOne or Varicam in that mix? While this introduction will be useful to anyone making action films, we're assuming that most people reading this list don't have access to that sort of gear.) Why is light sensitivity so important? Because, quite frankly, you want to be able to get the sharpest image with the least motion blur you can. I loved the beautiful shallow depth of field we could get with the Redrock Micro M2Encore when we shot Depleted: Day 419, but we cut down a lot of our options in post because these accessories shut out a decent amount of light and then we fed that image into the less light sensitive imager of the HVX200 camera. (Of course, with video DSLRs like the 5D Mark II and 7D as well as the new line of true video cameras that Panasonic is releasing, you can now have cameras that are very sensitive to light, yet can get the much more filmic depth of field, as well.)
We're going to assume that you're going to be putting some sort of slow-motion into your action film. Why do I say that?
Allow me to answer with a quote from Stu Maschwitz:
"Slow motion is to action films as guitar solos are to rock and roll: intrinsic, easily overdone, and still kind of great even when overdone."
No matter how many "fps"--frames per second--your camera can shoot (whether it be 30 fps for the DVX100 or 120 fps in burst mode for the 7ZU), it's never as much as you "NEED." Don't feel bad. The lust for speed is part of what draws action filmmakers to their craft—the simple irony is our need for speed is there so that we can make everything go slower! John Woo, the godfather of action films, reportedly shot most of his gun fights in the ultimate action film, Face/Off, at 200-300 fps. (The super slow shots you've seen on shows like Top Shot where a muzzle blast blossoms out like a flower as the bullet slowly pushes out of the barrel are shot with a $150K Phantom HD camera that shoots up to 10,000 fps!)
Since we continue to assume that you don't have access to Hollywood rigs, you can't get those high speed frame rates physically. As such, you have to use physics and post-production tricks to your advantage. Fortunately, there are plenty of tricks in After Effects (from using its own PixelMotion ability to using a plugin like Twixtor) to slow down the shot further in post, provided you understand how they work so you can shoot them properly. (And, of course, if you understand human psychology, you can employ an effect we'll talk about in our next article that I call the "Brass Effect.") The secret to shooting them properly is to realize that shutter speed is as important (if not more important) than frame rate. How so?
Well, the best post-production solutions for creating great slow-motion essentially create new frames in-between pre-existing frames through a process called "interpolation." If there are pristine, unblurred frames for the plugin to work with, it can build nearly pristine intermediate frames. From these, it can then build further intermediate frames. While you should not read this to mean that if you have a fast enough shutter speed, you're going to get an identical product in post to what you would've gotten if you'd shot with the Phantom (some information simply was NOT recorded by your camera, or, if it was, it only captured one frame of an action), you're going to have many more options in post if you can get as little motion blur as possible, regardless of how many frames a second your camera is capable of!
If you try to record gunfights with normal shutter speeds, you'll get motion blur like this. This is comparable to the type of motion blur you would get shooting with a shutter speed of 1/60th of a second.
However, the faster you can get your shutter speed, the closer you can get to removing motion blur, which can then allow you to rebuild missing frames in post..
Your goal is to try to get your camera's shutter speed as close to 1/576th of a second as you possibly can so that as much motion blur as possible is eradicated. (This is comparable to the fastest shutter angle film cameras are capable of.) As the normal way to shoot video is with a shutter speed of 1/60th of a second for 30 fps and 1/48th of a second for 24 fps, you can see how much faster this is.
The rub related to physics that you must be aware of is this: the faster your shutter speed, the less light is actually being exposed to each frame. This means that if you want to eradicate motion blur, you're actually cutting down the amount of light proportionally. As such, the faster you set your shutter speed, the more light you're going to need to throw at your subject to counter balance it. (Go back and rewatch some of the ultra-slow gun close-ups in John Woo films. Notice that you can't see much of the background? This is because of how much light is being directed on the subject in order for it to be visible at all!)
As such, for early tests, I would definitely suggest shooting on a bright sunny day outdoors so you can shoot with the highest shutter speeds possible and then see how your post-production work effects this.
Shooting outdoors can provide you enough light to shoot at a much faster shutter speed without extra cost. (Original photo of Tim Smith as Andre Flanagan taken by Nate Eckelbarger for Day 419.)
Tripod
It doesn't have to be fancy, but it does have to securely hold your camera in place. When you're working on creating slow-motion, all of your hard work in reducing motion blur of your subject can quickly go out the window if the entire frame is shifting around because you're handholding the camera.
With that said, you can choose to do a handheld action film, just be aware you won't be able to slow the footage down nearly as much without it "falling apart" as you would if you shot it with a tripod. (However, if you want the look of handheld, but still have maximum control over your shot in post, there is a trick that Andrew Kramer has passed around where you can slave your final AE comp's position settings to the "Wiggler" engine in After Effects and have it replicate a handheld look after you've shot the film on a tripod and done all your slow-mo and effects work already.)
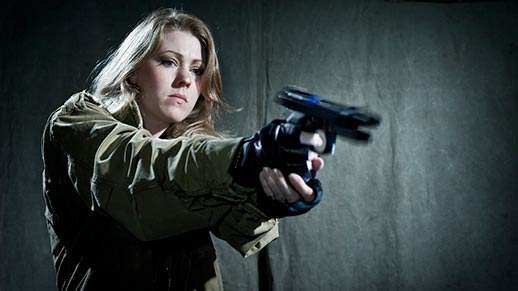
A variety of different realistic guns can be acquired to bring your gunfight to life. For the most realistic firearms, we turned to full metal Gas Blowback airsoft guns for Depleted: Day 419. The 1911A1 pistol shown here in actor Eric Henninger's hands is made by Bell.
Guns
No, not real guns. However, they have to look real to the camera. To start out with, get any guns that you can paint black and which are as realistic as you can afford. Airsoft-style guns are the guns of choice for most low-budget filmmakers, because they can be amazingly realistic and have many options depending on your budget, from springers, to Electric-Blowback, to Gas-Blowback.
Springers can be very inexpensive for as little as $5 up to $40. The downside is that they have no recoil and, because they're all plastic, don't look great in close ups, but for your gunfight training purposes they're great. (Additionally, for shooters that are in the background, they're more than fine, just add some extra weight to the gun so that the actor has to hold it more like a real gun.)
Electric Blowback (EBB) guns are usually plastic as well, but the plastic looks more like gun metal (or composite material that guns like Glocks and the FN Five-seveN are actually made of) and it has a slide that flies backward through a battery operated mechanism to simulate the actual blowback of a real semi-automatic pistol. It's more realistic than the springer (and its actual weight is more similar to a real gun, which changes how the actor holds it), but it's also pricier. EBB handguns will go from $40-$100. (Notice I didn't mention machine guns?? This is because EBB Machine guns can be outrageously expensive. Additionally, gunfights with machine guns are much more complicated to orchestrate believably on a micro-budget. This doesn't mean you couldn't do it, just that it's certainly not a beginner proposition. That's one of the reasons that the back story for the international creative community of World of Depleted includes a future in which ammo is very rare and valuable, as such it is rarely wasted on non-accurate weapons like submachine guns.)
However, when you're ready to make your masterpiece, it's hard to argue with the realism available from gas-blowback (GBB) airsoft guns. (We chose to use these when we shot Day 419 and the realism was incredible.) You can get these in full-metal versions that are so similar to the "Real Steel" guns that you can actually break down and clean them the exact same way. (In fact, some of the pricier versions actually have the legitimate trademark of the gun manufacturer on them.) Especially for the all-metal versions, the weight on these guns is identical to the real guns, and the blowback provided by the gas cartridges is identical to the real guns (plus you can actually see the gas emitted in smoky or dusty environments, making post effects even more authentic). However, at $100-$800, these are pretty pricey, so you definitely don't want to start with them unless you know you're going to wanting to be doing action films regularly! (The ones we ended up using ran just over $100 a piece and I spent hours reading reviews and watching YouTube videos of the guns before ordering them. Fortunately my research paid off, as the guns proved reliable, authentic, and nearly as rugged as the actual guns they stood in for. Specifically we used a couple of military black KJW M9's and a Bell 1911A1 pistol.)
To learn how to remove or repaint the orange gun tips of your guns and to allow them to dry fire, check out the World of Depleted/MFM tutorial above!
Two or More Actors (who are NOT you)
If you're going to have a gunfight, you must have at least two actors. (Even Fight Club had the internal fight for the gun occur with both actors present!) For your early tests, don't use more than two, because you don't want to have to buy pizza for more than two people until you're really sure you know what you're doing and that you will have a cool little video you can show on YouTube for your friends! (The reason you want to make sure that it's not you is because you need to checking out the shots from behind the camera. I failed to make certain that I had two separate actors for an early test scene that I did and ended up having to play the opposite role. Not fun—and, also, not amazing filmmaking! However, I'll share the link with you so you can see an example of an early test and also laugh at it a bit!)
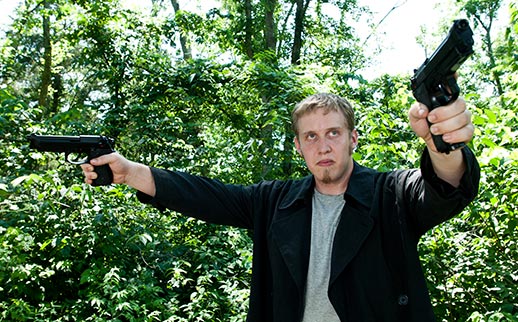
Early Test of Effects for Day 419 with a flare to the overly stylistic. (Again, notice that if one of the actors is not someone else, you get to be the actor! This is a bad idea, so always have at least two actors who aren't you!)
An Interesting Location (Where It's Okay To Wield Real-Looking Guns)
This may seem self-evident, but a good location where you can have your actors wield real looking guns is very important. You don't want people calling the cops and you definitely don't want a "helpful" citizen shooting one of your actors because they think they're trying to kill your other actor. As such, spend time finding a location where you know you're not going to run into problems. (If you happen to have friends in your local police department, see if they want to come out and help you with your shoot. In addition to having a more direct way to alert the local police about what you're doing, being able to tell people you have an off-duty officer in your cast or crew can be a great way to get permission to shoot in places, since they know you're going to be far more responsible in that situation.)
VideoCopilot.net
A website? Yes, a website. Andrew Kramer's VideoCopilot.net, to be exact. Kramer is perhaps one of the most prolific After Effects' trainers out there. Specializing in the sort of effects that are most necessary for action films and gun fights, his tricks for using After Effects will teach you ways you can cheat the system to get shots you could never otherwise get!
Best of all, a massive amount of his training is completely free! That's right, FREE! Now, once you go to his site and learn the cool things he teaches, you'll be very tempted to pick up one of his very cool collections or plugins. (While you might not HAVE to have these elements, if you can afford them, you won't be a bit sorry, especially for Action Essentials 2. More on that later.) If you decide to pick them up, you can get a discount on VideoCopilot gear at Toolfarm.com.
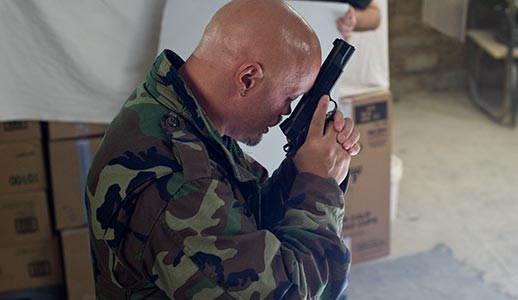
World of Depleted's Training Video on Gun Safety (with Aaron Little)
Gun Safety? Why do you care about that? You care about that because actor's that treat all guns as loaded instruments of death are for more likely to not get injured on set! As an added benefit, people who know how to hold guns realistically are far more intimidating on screen and people who know about guns (who are probably in your audience) aren't going to write them off as idiots and switch to another video. Aaron Little, the trainer in this series, was the firearms trainer for the Academy Award Winning film, The Hurt Locker. As a personal favor to one of our actors (who he was friends with), he did the training for free for the cast of Depleted: Day 419. And now we pass on the training for free to you, our readers!
By teaching your actors how to accurately hold guns and maintain proper sightlines, your gunfight will be much more believable and much easier to realistically edit!
Now that we're done with the Bare Necessities, are there other things we'd recommend? Certainly.
The
director of two feature length films and half a dozen short films, Jeremy Hanke founded Microfilmmaker Magazine to help all no-budget filmmakers make
better films. His first book on low-budget special effects techniques, GreenScreen Made Easy, (which he co-wrote with Michele Yamazaki) was released by MWP to very favorable reviews. He's curently working on the sci-fi film franchise, World of Depleted through Depleted: Day 419 and the feature film, Depleted.


 The reality is that you need a program that has more control over images, speed, and plugins than a traditional video editor. While you can certainly edit a gunfight with a traditional editor, your ability to make combined effects that are truly believable is far lower than it will be with After Effects. People like Andrew Kramer and Stu Maschwitz are living proof that some good training, this is a program that will allow you to do things you've only seen in Hollywood films.