|
|
 |
 |
Parts |
|
|
| |
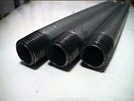 |
Pipes
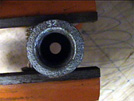
First you'll need three pipes. I like to use 1/2"
galvanized steel or black iron. It's strong, threaded
at the ends, and a comfortable thickness. You can
use any length pipes you like, but this project uses
three 10" pipes (about $1.50 each).
|
|
| |
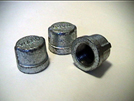 |
End
caps
You'll also need three end caps. You can get away with
just two, but the last one is used to cover up those
nasty sharp threads on the end of the pipes. I've gotten
cuts while building these things by accidentally grabbing
the threads too hard . These are about 80 cents a piece.
Make sure they fit the pipes, 1/2" diameter.
|
|
| |
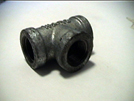 |
Tee
Basic T-joint. Again, make sure it fits the pipes. If
your standard hardware store doesn't have this, you
can try a plumbing store. About $1.30.
|
|
| |
 |
Weight
This is just a simple barbell weight from a sports store.
The one shown in the picture is 2.5 pounds, but you
can buy any weight you want. But, anything heavier than
5 pounds starts getting too heavy to carry around. Get
a weight that has a 1" diameter hole. These are about
$3.
|
|
| |
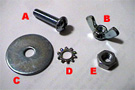 |
Other
small parts
Here's a break down of what you'll need:
A - two 1-1/2" 1/4" machine bolts
B - one 1/4" wing nut
C - three 1-1/2" diameter flange washers for 1/4" bolts
D - three lock washers for 1/4" bolts.
E - two 1/4" machine nuts.
All these together costs about two dollars. You sometimes
can find these for really cheap at a specialty hardware
store. General hardware stores tend to charge a lot
for the specialty washers and nuts.
Total
Cost: 3 x $1.50 + 3 x $0.80 + $1.50 + $2.00 + $3.00
= $13.40 (yours will vary)
There you go. Can't get much cheaper than that!
|
|
|
Assembling
the Handle |
|
| |
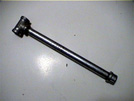 |
This
first step is pretty easy. Just attach the tee and end
cap to one of the pipes to form a basic handle. Feel
free to tighten these parts together as much as you
like. I recommend using the vise and a wrench. Don't
use your hands, you'll just hurt yourself and not get
it tight enough |
|
|
Drilling
the End Caps |
|
| |
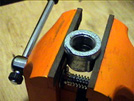 |
Put
one of the end caps in the vise as shown. Then drill
a 1/4" hole in the center of the cap. It's doesn't have
to be perfectly in the center, but the closer the better.
You really want to use the vise because you're drilling
through a quarter inch of galvanized steel. It's enough
to bring weak drills to a dead stop and will definitely
do a number on your hand if you just try to hold it.
Not mention it can get hot. Protective eyeware such
as safety goggles should AWLAYS be used when using any
power tool! Also little bit of machine oil (or even
vegetable oil) can make this easier as well as preserve
your drill bit. I like using a slow speed because when
the bit comes out the other side it'll jerk from grabbing
onto the metal. It's far more pleasant to have a slow
jerk than to have the drill suddenly fly out of your
hand. Do this in a place that's easy to clean up. You'll
make lots of metal shards. Outside is where I did it.
And don't use you fingers to wipe away the shreds!!!
They'll get in your skin. Use a brush, or blow the shards
away.Do this for two end caps. |
|
| |
 |
|
|
|
|
|