In today's burgeoning media landscape, the use of computer generated imagery is expected in almost everything, and to some degree taken for granted. It was only a few short years ago that simple, geometric graphics made from computers were lightly dispersed on the background monitors of sci-fi movies or used solely for the first 3D gaming consoles. Special effects in films have improved and video game hardware has evolved, and alongside it has been the tools that have been used to create all those great memories that we've experienced on the screen. While many others have fallen by the wayside, Autodesk 3ds Max has grown over the years to meet the needs of its users and has been one of the leading 3D solutions in our industry today.
3ds Max's origins go as far back as Solid States and CAD-3D, produced by Antic for the Atari ST. Over the years of developing those early versions of the program, the core team dreamed of creating a cutting-edge tool that could be utilized to make compelling graphics for the screen, both film and video game. Not only was the software meant to answer the needs of what digital artists needed to do models, animation, and composites, but it also needed to have a consistent look and documentation that both professional and home-brew amateurs could understand. Add to it an online community for users to exchange information and you have an amazing foundation for what we have come to expect when approaching any new 3D software. Finally debuting in October of 1990, 3D Studio has built a proud and influential legacy that continues on to this day.
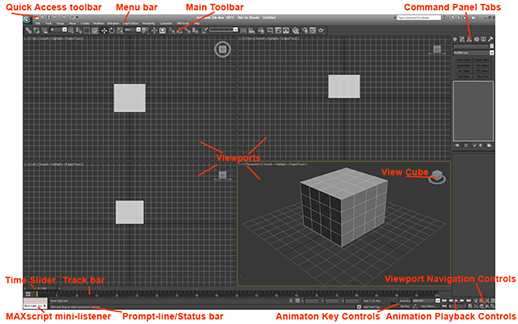
Autodesk 3ds Max 2011 conceals a lot of depth behind a sleek interface.
This article on Autodesk 3ds Max 2011 will look over the basics of navigating around the interface and general overview of the workflow of the different disciplines. The newest features will be covered as well as options that are unique and/or necessary to your experience with this product. This is by no means an exhaustive account of how the program works, but rather a small overview of what to expect when working in its environment. 3ds Max has long been a powerhouse in the world of CG, so anyone who is interested in creating special visuals for the screen should take the opportunity to get familiar with this well-loved toolset.
Ease of Use
The interface for Autodesk 3ds Max 2011, when first initialized, is very clean and spatially laid out in a way that reflects the standards of most 3D programs. Despite its minimalist look, there is a depth of options that can be accessed based on context. Menu icons at the top have right-click abilities that reveal fly-outs of menus of more icons. Panels under the Command palette have collapsible rollouts allowing users to only show necessary information for the objects that are selected. By right-clicking specific objects or viewports, operations and options relative to the selected can be administered. Lastly, numerical values can be typed straight into the input field or, by clicking and dragging the adjacent "spinners", dial the value up and down to see the results in real-time. When first working with 3ds Max, an important part of getting comfortable with the interface, is understanding the nature of how it presents its tools and options in all its various forms.
There are several ways to move the viewport camera or objects within 3ds Max. To track, dolly, or zoom in a selected viewport, users can click the middle mouse button by itself or with a specific combination of ctrl or alt keys in order to move around the 3D space. Toggling one of the controls in the Viewport Navigation Controls in the lower right sector of the interface lets users choose one way of moving through the selected window. Also, a fun little widget that you can access if you want to navigate through a 3D environment is the Steering Wheel panel that can be activated by pressing Shift + W. This gadget displays all the standard movements for the selected camera with very little mouse movement to direct it. As for objects, the general Move, Rotate, and Scale gizmos can be brought up by either keyboard shortcuts or toggling one of them in the Main Toolbar area near the top of the interface. Lastly, components of a mesh, like vertices, edges, and faces, can be activated from Command Panel when the object is selected. 3ds Max allows users choose the most efficient way to manipulate your camera or object.
The graph editor and dope sheet are two tools you can use to refine your animation.
Before modeling in 3ds Max, specific steps must be taken in preparation before you start to shift verts, edges, and faces. On the Command Panel to the far right are lists of various functions and utilities that can be added or used to modify objects in the viewport space. Beginning with the Create tab, users pick from an assortment of primitives and objects to lay the groundwork for their mesh. Depending on the complexity of the mesh, one-to-three clicks, on average, help to establish your base object to tweak further using the parameters in the Command. Under the Modify tab, users are able to attach one or more Modification parameters to the mesh. Modifications like Edit Mesh, Bend, Mesh Smooth, Noise, etc. can be stacked, reshuffled, and turned off and on allowing users to work and experiment non-destructively to see the effects that it will have on the selected object in real-time.
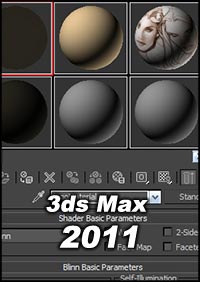
When the time comes to texture, 3ds Max 2011 has a very straightforward Material Editor to work with. Materials (or "shaders" as they are sometimes referred to) carry the characteristics of how the lighting interacts with the surface of the mesh. The Material Editor allows you to designate a place to store your shader, adjust the parameters and see the effects of most of your shaders in real-time on the screen. Just like the Modify panel, certain shaders can be stacked for blended looks. The Material Editor offers a plethora of controls in order for users to refine the look of the model's surface.
Rigging characters using constraints and interactive IK can all be done utilizing controls from the Hierarchy tab from the Command Panel. Depending on what type of movements the character will engage in, users can choose between options under the Pivot or IK tab to best fit the needs of the animation. From there you can pick the appropriate tool to select a child and parent to constrain the transforms. Any controls that are unnecessary for the rig can be locked from the final tab labeled Link Info or frozen by right-clicking the joint. Once the rig is ready to go, its' a simple matter to get it moving.
The workflow for animating in 3ds Max is quick to pick up on if you have worked with any other 2D or 3D animation software. Upon setting up your rig, animating its components is as easy as activating the Set Key toggle, translating the pivot, and setting the keyframe. Keyframe filters allow users to focus on just those translation coordinates that are natural for that selected section. Duration of the time range can be updated from the Time Configuration window to extend or collapse the time. And finally, the Curve and Dope Editors provide a means of tweaking the animation to realize every intended nuance.
The lighting and rendering in 3ds Max 2011 is easy to work with and offers a lot of control. Lights fall in either two categories, standard, which is unrealistic lighting, or photometric, which more closely resembles natural lighting interactions. Once created, the light can be moved around freely in the viewports and adjusted in the Command panel to see the real-time update. For the final look, clicking the "teapot" render icon at the top right side of the menu lets you render what the camera sees. Based on your render settings, users can see a draft or finished render of the final look of the composition.
The Material Editor is where artists can create, refine, and apply a texture map that will be used on objects within a scene.
New Features
The new Slate mode of the Materials Editor is a much more efficient way to work with your materials. Using the previous mode, users had to cycle up and down through the connections of attached texture maps in order to make modifications. With the new Slate Editor, users are given a node-based hierarchy that provides a means of attaching maps and making adjustments to all the materials that are connected to a selected object. Being able to see the make-up of your material hierarchy at a glance definitely helps to speed up production.
Containers in 3ds Max 2011 are an amazing collaborative workflow that greatly speeds up production. The way it works is that a scene that is a work-in-progress is held in a Container, but certain attributes and areas are only accessed by the people they are assigned to while locking everyone else out. A modeler can build and move objects in a scene, but allow a texture artist to apply materials without disrupting the geometry. Sections of the scene can show only the objects that are going to be animated so that the animator can focus on moving objects, adjusting cameras, or adding particle effects. Based on selecting different Rules, you can give artists access, lock out certain parameters, or hide unnecessary background objects. When properly administered, working together on a single Container can really be a blessing in a time-sensitive production.
The Quicksilver Hardware Renderer does just what the name implies: quick hardware rendering. Waiting on a Mental Ray render can take a very long time, longer than what you may need just to get an idea of where your scene is at. With Quicksilver, you can get really close to a Mental Ray image but with less than half the time it takes. In order to get that near-finished look, Quicksilver supports alpha, z-buffer, depth of field, motion blur, dynamic reflections, indirect lighting, and a few other components. So for users that need to preview their status or just need an acceptable level of quality for dailies at a meeting, Quicksilver is a powerful asset for time-crunched artist.
The Graphite Modeling option has been updated with new texture and paint tools for your Viewport Canvas. Taking a page from popular sculpting programs like Zbrush and Mudbox, 3ds Max 2011 has the ability to paint and texture models directly on to the model. Alpha textures, layers, blending modes and custom color swatches can also be utilized for added control and more convincing effects. The painted maps can be seen on the model as well as the 2D view of the UV texture map. And just in case you feel more comfortable finishing the job in a 2D paint program, the texture maps can be exported out as PSD files for Photoshop.
Autodesk 3ds Max 2011 now includes "Composite" as one of its features. Composite is a node-based system in which separate plates can be brought together and processed through various nodes that are linked to a final output. The environment can be rearranged and different tabs can be accessed to make changes to your scene, like animation, color grading, and editing. This powerful addition is a great asset for users that don't have the funds to spend on extra video editing software.
Adding lights to your scene and seeing a render takes no time at all.
Depth of Options
In most 3D applications, it's pretty common to be able extend control of the program through the use of scripting languages and plugins. From early iterations of 3ds Max, the native scripting language MAXscript has been made available for users to extend and improve their working experience. Several improvements have been made over the years to allow control of the deeper facets of the program, be able to debug the code, make use of external assemblies, and many other useful resources. MAXscript and plugins for it are an important service for the 3ds Max community to share and extend the value of 3ds Max.
For the animators, 3ds Max's character studio provides templates and functions that can be applied to your animation. Since most character animation is done by biped, or humanoid, type characters, character studio supplies you with a basic skeletal hierarchy for users to apply to their mesh. Footstep animation can be controlled from the Command Panel allowing artists to adjust gravity, balance, and other parameters. Freeform animation is also an option if you have a unique joint hierarchy and need to tweak the minute nuances, or loading in motion capture data for movements that have already been acted out. Animators are given the ability to switch between mocap movements and manual animation at will and the Motion Mixer is made available to blend between the two nonlinearly. The Animation Workbench allows users to refine the translation curves either manually or by having the tool analyze and adjust errors. Finally, character studio also provides a way to control crowds of bipeds procedurally, using forces and behaviors to determine character movement.
The Scene Explorer gives users a catalog of all the objects currently in the scene. For complex layouts, the Scene Explorer helps to get artists up to speed quickly to find and select objects, assess the hierarchy, and filter results. A great place to start when entering a new project or opening an old one that looks a little confusing.
The Command Panel is the main hub for working with the in-depth parameters of objects and components in your scene.
Performance
Autodesk 3ds Max 2011 works really well on a standard computer rig. Once you understand the workflow of the toolset, actions like maneuvering through the work space, modifying meshes, applying modifiers, or switching through different editors is very responsive. Even the real-time adjustments that can be made in an object's parameters are updated immediately in the viewport. The addition of the Quicksilver Hardware Renderer is extremely beneficial since, a lot of times, that is where the highest bottleneck in production is located. Very few times did I come across a hiccup or slow down that couldn't be remedied by refreshing the viewport and the occasional restart. All in all, any user wanting to get familiar with this application will be pleased with the results on the average computer hardware available today.
Value
Autodesk 3ds Max 2011 has so many great things going for it. An understandable and straightforward workflow for building your models and working more or less undestructibly. Powerful texturing, shading, painting, animation, rendering, and compositing editors for users to have everything they need to complete their work. Plenty of documentation and a huge online user community to find solutions to the majority of challenges. Artists will get so much bang for their buck investing in this fantastic software. (And if you're a student that uses Autodesk's special student link, there's zero cost for three years. Who wouldn't love that?)
Final Comments Most anytime you start working with a new piece of software, you are going to have to adjust the way you approach the creation process and expectations. New users will find it a pleasant surprise to see what this program has not only on the surface level, but down deep below. This newest iteration offers so much for the solo artist that is trying to make his or her work stand out, that it's hard not to get excited about getting into the program and seeing what it can do. Most anyone that has kept up with the technology side of computer graphics has at least heard of 3DS 3ds Max and knows that it is used widely. So after working with its newest incarnation myself, I'm confident to recommend this software to anyone with an ambition of getting into the CG industry or who wants to add 3D elements to their films.
Ease
of Use
8.5
Depth
of Options
10.0
Performance
8.0
Value
vs. Cost
9.5
Overall Score
9.0
Michael Muwanguzi is a graphic artist and web designer currently living in Los Angeles, CA. Apart from working on print ads, web-related advertising, and 3D design work, he is currently working on new film production work and is designing a 3D adventure game from scratch.


 In today's burgeoning media landscape, the use of computer generated imagery is expected in almost everything, and to some degree taken for granted. It was only a few short years ago that simple, geometric graphics made from computers were lightly dispersed on the background monitors of sci-fi movies or used solely for the first 3D gaming consoles. Special effects in films have improved and video game hardware has evolved, and alongside it has been the tools that have been used to create all those great memories that we've experienced on the screen. While many others have fallen by the wayside, Autodesk 3ds Max has grown over the years to meet the needs of its users and has been one of the leading 3D solutions in our industry today.