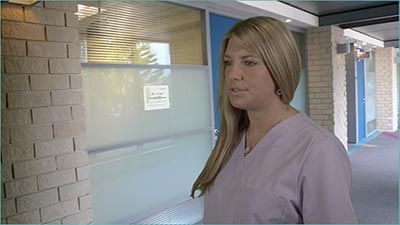
The screen is evenly lit. The image is a bit low contrast, but here’s the trick: this key required only one setting. Primatte Keyer 4 has a feature called “Auto Compute” which is an artificial intelligence assistant. It analyzes the image and takes its best guess at establishing the key parameters. After it sets the initial key, you can go in and fine tune if necessary. In this shot I might have adjusted the contrast in the foreground after the key was pulled, but then again, maybe not. The actor’s lighting is fairly believable in the dimly lit hallway.
These results are pretty incredible for a one-click key. This is a shot that, without Primatte Keyer 4, I might have spent about five minutes setting up. Anyone who does a lot of key work will find Primatte Keyer 4 to be a real timesaver. It has the intelligence and ease of use to be fast, and it also has the depth of features to handle the toughest keying jobs.
Learning
Whenever I get new effects software I follow the same pattern. Compare your experience with mine.
(1) Stare at the interface and realize that I don’t know how to use it.
(2) Blow several hours reading a manual that describes mathematical algorithms I can’t understand, but are apparently required to use the tool.
(3) Search the Internet for a tutorial that describes step-by-step how to use the tool by someone that’s figured it out.
Primatte Keyer 4 is different.
The interface is laid out in the sequence that you use the controls – top to bottom, left to right. The PDF manual that comes with Primatte Keyer 4 is about the best written, clearest, easiest to follow documentation I’ve seen with any key software or effect.
Primatte Keyer 4 overloads the “pointer” tool in After Effects for sampling. When you select one of the sampling tools in the Effects panel, you just move the pointer directly to the viewer window and make your selection. The change to the key is instantaneous.
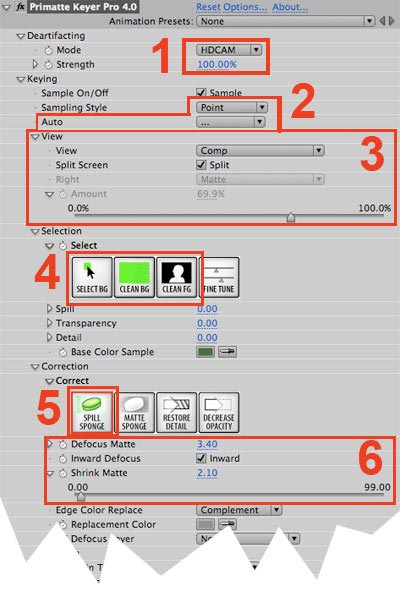
The following numbers refer to the image of the Primatte Keyer 4 interface, below.
(1) Select a de-artifacting mode to get rid of compression edge artifacts. You can choose DV, HDV, HDCAM, or “Other” which means “take your best guess”.
(2) Select “point” or “rectangle” sample. Or choose “Auto Compute” to set all parameters automatically.
(3) Very handy. Primatte Keyer 4 allows you to view in split-screen so that you can work with the matte and the final image at the same time. This is a real time-saver because you can clean the background, foreground, AND use the spill sponge without swapping view modes.
(4) This is the sampling part of the interface. You just click on the sampling tool and then drag in the viewer window. Select BG sets the initial key. Clean BG refines the background – just drag over artifacts and they disappear. Clean FG refines the foreground – just drag on the white matte on anything gray and it turns solid white.
(Explanation of interface continues below)
(5) The Spill Sponge is the most amazing tool. Most spill suppressors I’ve seen work on the entire image, discoloring edge areas and turning them magenta. The Spill Sponge is somehow very selective. You simply go to the final view and wherever there is spill, just drag a short line over the area. Suddenly, the original color snaps back in! Spill gone.
(6) At this point, the key is very good, but the edge is usually saw-toothed.
Finally, there are tools to soften the matte edge, either defocusing it inward or outward, and also there is a choker (shrink matte). Apply just enough to get rid of the hard edge and the key is done!