Here is another cool way to take advantage of the 3D features in Photoshop CS5. So many 3D effects use obvious 3D shapes and that works great, but you can also use shapes to carry a certain type of effect. In this case we are going to make the extrusion material of a text object appear as though it has a light burst coming through the text. It will give you a good idea of how creative you can get just masking a shape.
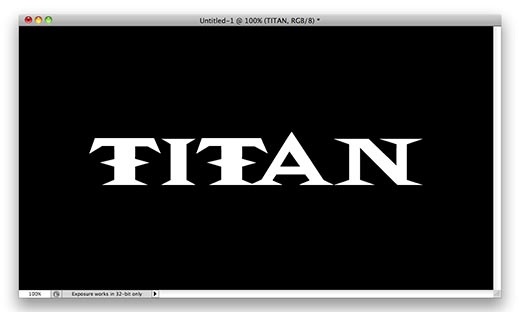
Step 1: Start by creating a new document 9"W x 5"H at 100 ppi, then select the Text tool in the toolbar. Click in the canvas to set a text layer and type the word or words you want to apply the effect to. Here I chose TITAN in a special stylized font.
Step 2:
This technique calls for some unusual approaches. Before we apply Repoussé to this layer we need to flip it around. It will make sense later. Go under the Edit menu to Transform and choose Flip Horizontal.
Step 3:
With the text layer still selected, go into the 3D menu to Repoussé and choose Text Layer. Set the Extrusion Depth to 5 and the Scale to 5 as well. (Remember: applying Repoussé to a text layer will rasterize the text. So it may be a good idea to duplicate the text layer.) This will extrude the text back and make it larger at one end than the other by 500%. Use the mesh tools to move around the object to see the extrusion if you like but remember to click the Home button to return to original position. Click OK.
Step 4:
Now we need to flip the text back around so it will read right. Except we cannot flip it the way we did before because the text is a 3D object now. Go into the toolbar and select the 3D Object Rotate Tool. Then go up into the options bar and enter 180 in the Z orientation.
Now would perhaps be a good time to save your work.
Step 5:
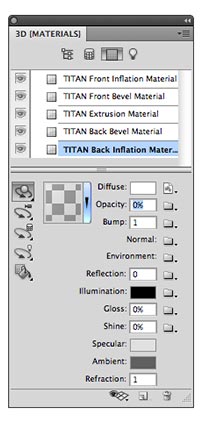
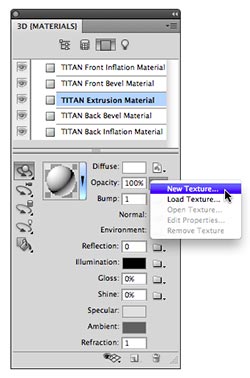
Go into the Window menu and choose 3D to open the 3D panel. Open the Materials section and in the materials list locate the TITAN Back Inflation Material and select it. Then, just below, enter 0 in the Opacity setting. This will make the back face, which is actually the front of the text, invisible.
Step 6:
Next, locate and select the TITAN Extrusion Material. Go to the Opacity setting again and this time click on the small folder icon and choose New Texture from the menu. A new document window will pop up. Go ahead and make this new document the same size as the working file. Click OK.
Step 7:
Now you notice it did not open the file. It just created the new document and attached it to the Opacity property. We need to now open the file by clicking on the menu next to Opacity once again and then choosing Open Texture from the menu.
Step 8:
This new Opacity file works the same way a layer mask works in Photoshop. It's just in 3D and is a separate file rather than attached to the layer. However it does use black to hide areas, white to reveal, and gray areas show some transparency. What we are after here is a light burst effect coming out of the text.
Press D to set the toolbar colors to default black & white. Then go under the Filter menu and goto Render and choose Fibers. Go ahead and use the default settings and click OK.
Now go under the Filter menu again and go to Blur and choose Motion Blur. Set the Angle to 90 so the blur is going straight up and down and set the Distance to around 400. This will give you smooth varying gray streaks. Click OK.
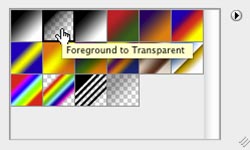
Step 9:
Now go into the toolbar and grab the Gradient Tool. In the options bar click on the gradient preview and choose Foreground to Transparent gradient. Make sure black is set as the foreground color. Click to start the gradient at the bottom of the image. Hold the Shift key down and drag up close to the top of the document.
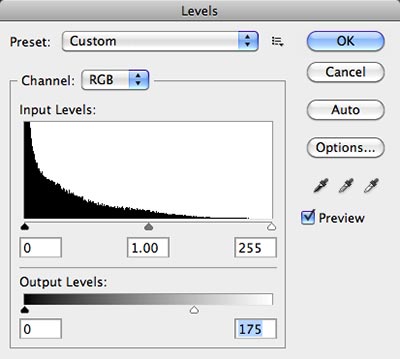
Step 10:
If the light beams still seem a little too light just make a quick Levels adjustment. Go under the Image menu to Adjustments and choose Levels. Here I just set the Highlight Output level to 175; this will darken the overall image rather than introducing a lot of contrast. Click OK.
Here also would be a good place to save!
Step 12:
Go into the Materials section of the 3D panel and highlight the TITAN Front Inflation Material. Move down to the settings and you will see Color Swatches next to Diffuse, Illumination, Specular, and Ambient. Change all of these to white. Do this for the Front Inflation as well as the Extrusion Material. This will eliminate any dirty light noise that may appear.
When the Outer Glow window opens, go into the Structure section and click on the color swatch and change the color to white, then set the Opacity to 50%. Move down to the Elements section and set the Size to 20. These settings work for this scenario but you may need to tweak your settings if you are using different text or artwork. Click OK when done.
Step 14:
We certainly could have built this graphic in color but I chose to build black on white because that will allow me to use an adjustment layer to change the color on the fly.
Simply go into the Adjustment layer menu and choose Hue/Saturation. Check Colorize and set the Hue to 30 and the Saturation to 75.
This will give the overall text object a yellow/gold look.
At this point save your work again. Then feel free to use the 3D object tools to rotate the object at different angles. Notice how the light burst looks cool pretty much from any angle, giving numerous compositional possibilities with a single 3D object. You can also change the color in the adjustment layer to get an entirely different look altogether.
(Reprinted with Permission from 3D in Photoshop, Focal Press, Copyright 2010)